Here's a great project for your little train lovin' boy.
TUTORIAL:
What do you need?
Train Template - Engine and 6 cars
Fabric Scraps
Pencil
Fabric marking pen
Wonder Under (iron on fabric adhesive)
Scissors
Lots of Buttons
1. Trace your patterns onto the Wonder Under iron on adhesive.
2. Cut them out.
3. Iron each piece onto the wrong side of different scraps of fabric. I used canvas and heavy cotton fabrics that fray well.
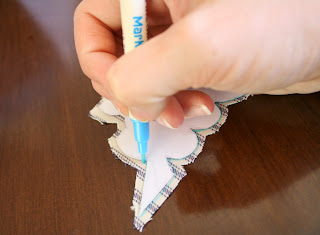
5. Turn over your freshly cut train pieces and use your pattern to draw the train shape on the right side of the fabric using a washable or disappearing ink. I love my "Mark-B-Gone" marker for these types of projects. For dark fabrics you can use a white colored pencil or chalk.
Continue onto the back of the t-shirt.
7. With contrasting thread, sew around each train car on the line you marked earlier. I made the mistake of using matching thread and i had to go back and re-sew the train edges so you could make out the train shape.
9. Make your freezer paper stencil. I used my handy-dandy craft cutter to cut this one. Iron it onto your shirt on low heat.
10. PAINT! (the best part!) I used screenprinting ink but you can also find textile paints at your local craft store.
11. Collect your buttons. 15 small buttons and 1 large button. This is a good way to use up some of those buttons that have sitting around in your craft supplies.
12. Sew on your wheels.
That's it! And now you have a one of a kind Frayed Train tee for your "Trainiac".
We just linked up to the fabulous I Am Momma Hear Me Roar Blog. Cheri is hosting "Let's Hear it for the Boys" shirt contest!
If you need some crafty ideas you NEED to check it out! There are so many amazing entries already!


23 fabulous people said. . .:
Really cute! I love the "trainiac" ... and I think it's so fun the way it goes around to the back of the shirt as well.
This is very cute!!!
Visiting from I Am Momma's links. . . Adorable! I have two trainiacs at my house and they will love this shirt. Thanks for the tutorial. I will be making one (or more) soon.
i love that the train comes from the back. great detail. looks like he likes the shirt!
Love, love, love this! I like the frayed edges and the way the train wraps around the back of the shirt. My son would love something like this!
LOVE the buttons on the train! what a fabulous idea :) saw you in the contest linky party
i love this shirt!!! the buttons are a great touch!
i made i similar style shirt for my little guy with a dino on it.
drop by my little blog and check out my 2 ties tutorial - it has a fray effect too!!
http://polliwogsinbloom.blogspot.com/2011/03/2-ties-tutorial.html
all the best.
sue
hi! me encanta tu proyecto ( i like your proyect) maybe it will inspire me in the future!besos desde Spain
This looks great! I love the different fabrics you used for each car, and the buttons. Well done!
OMG i so need to make this for my son! He loves anything to do with trains. The shirt looks as though it was store bought. The train design is fantastic.
Thanks for linking it to "I am Momma, Here Me Roar" as that is how i found you.
I adore this Tee! My son is obsessed with trains! Might have to try one like this! thanks for sharing over at IAM-HMR!
So cute! The different fabrics and buttons are totally awesome. My oldest was into trains, but not so much any more. I miss it :(
Such a great T-shirt! Thanks for the inspiration.
One of the few shirts in the contest that I came over to check out. Nice job! I'll make one of these for my oldest for his 6yo birthday.
-Stefanie
2ndChanceCreations.etsy.com
Thanks again for the idea! I've made a girl version that I blogged about here: http://mamacrafts.com/2011/04/18/a-train-tee-for-a-little-girl/
This is adorable! Wonderful looking train! My two year old who loves "choo choos" would love this. BUT the template is giving an error message. Can you check it or email it to me? Would be super great! Thanks!
I love this so much! Thanks for making a great tutorial!
I featured on my Sew Boy feature
seemesew.blogspot.com
Hi, I am really glad I have found this info. Nowadays bloggers publish just about gossips and internet and this is actually irritating. A good site with interesting content, this is what I need. Thank you for keeping this web site, I'll be visiting it. Do you do newsletters? Can not find it.
car scrappers sydney
cash for scrap cars sydney
Get cash for cars Canberra from Canberra Car Removals, leading car buyers operating in Canberra.
car removal canberra
Get High Cash for Cars Black Forest. Highest cash payment up to $9,999 on the spot; Sell Any SUV, Car, Ute, Truck, Van, Jeep, or 4WD; A free valuation in.
cash for cars black forest
Cash for Cars Hamilton pay cash for cars, vans, 4wd or trucks. We buy all makes/models of vehicle.
cash for cars hamilton
I am surprised how many attempts you set to make such an excellent informative website. Looking to sell your car?All thanks to the team effort! Unwanted Car Buyer Gold Coast Avail of our quick and hassle-free car removal deal without worrying about the towing cost.
Post a Comment