


All Patched UP - Boy's Designer Jeans Tutorial
What you need:

Sand paper
scrap denim
Wonder-under (or other lightweight iron-on fabric adhesive)
Sewing machine
Embroidery thread and needle
Anything else you want!
If you are doing this for girl's jeans you can always add appliques, gems, ruffles, or tons of other fun stuff. I like to keep it simple for my boy's jeans. This is also great for hand-me-downs that need a pick-me-up.
Step One: Rough 'em up.
Use your sandpaper to distress the parts of the jeans that would normally get the most wear. Use care with the knee area though. The knees are usually the first part to wear out on their own. Rough up the front and back pockets and you can even choose some spots to wear all the way through to give them an authentic vintage look. The sandpaper will make a more dramatic effect on darker demin.


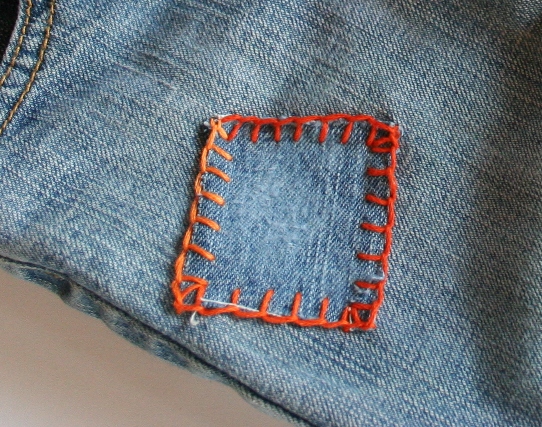
Step Two: Patch it.


Sew on your patches to secure them into place. You can also use decorative stitching to add more oomph! I will be using embroidery stitching for most of mine. I used my machine for the inside patch. What a cool vintage effect!

I love playing around with fabrics patches too. Try using canvas or other sturdy fabrics.
Step 3: Stitch it.
Be creative and add some simple embroidery stitches.

A little color can add a lot of fun to some boring jeans. Or you can use neutral colors if you want to make sure your child's new jeans match his wardrobe, and his Cantaloupe Corner shirts, of course. Black, tan, grey, navy, or white.


That's it.
Now your kid has the cutest pair of designer jeans out there. Designed by you!

(P.S. The "Super Hero" Shirt can be found HERE )


1 fabulous people said. . .:
You have provided the detail steps as well as the image presentation involved for making the designer jeans. With few things, we can easily make these designer jeans at home. Thanks for this valuable and informative post.
Post a Comment