March 11, 2011

We be Jammin'- {blackberry style} recipes included

March 11, 2011
I'm a sucker for a good deal. Especially when it is on something healthy too!
I hit the blackberry jackpot at the farmer's market and got some of these babies for a steal.


These are one of my favorite food. And they are jam-packed with nutrients, namely anti-oxidants. That amazing stuff that helps prevent cancer!  Tasty cancer-fighting ninjas!
They are also high in manganese and vitamin C, and high in fiber.


But they don't last forever. They are best eaten raw but if they are getting ripe you can freeze them and throw them into your favorite smoothie. I also LOVE blackberry muffins.

Here is my recipe for blackberry muffins:

1 3/4 cups All purpose flour (or wheat flour)
1/2 cup sugar
2 tsp baking powder
1/4 tsp salt
1 beaten egg
3/4 cup milk
2 TBS oil
1 cup mashed blackberries, (frozen, then thawed)

1. Grease muffin tin and preheat oven to 400 degrees.
2. In a medium sized bowl, combine dry ingredients: flour, sugar, baking powder, salt.
3. In a separate small bowl, beat egg, add milk and mix well.
4. Add egg mixture to flour mixture and stir until just combined.
5. Fold in mashed blackberries. This will turn the patter a lovely purple color.
6. Spoon batter into 12 prepared muffin cups, 2/3 full
7. Bake at 400 degrees for 18-20 minutes.  Serve warm.


And when you have too many blackberries to make a batch of muffins, you make JAM!


Blackberry Jam

4 cups raw mashed blackberries (mash in layers with a potato masher, don't use a food processor or blender for this part.)
6 cups sugar
2 tablespoons lemon juice (more or less, depending on how sweet your berries are)
1 package powdered fruit pectin.

1. Mash berries and pour into a large pot.
2. Slowly stir in fruit pectin, a little at a time. Then add lemon juice.
3. Bring mixture to a boil over high heat.
4. Add sugar all at once.
5. Bring mixture back to a full boil, and let boil for 1 minute.
6. Remove from heat and ladle into clean, hot, 8oz jars. Leave 1/4 space at the top.
7. Wipe the rims, add lids (according to directions), and place in hot water bath canner, be sure water is 1 inch above the jars. 
8. Process in canner for 10 minutes.
9. Remove from canner. Let set for 12 hours.


 There are also ways to make Sugar-free jam, using fruit juice, honey, or Splenda.
This site is also great for first time "jammers".

Happy Jammin'!
Related Posts with Thumbnails

March 10, 2011

Hoo Hoo's cute? { Baby's room owl wall art }

March 10, 2011
Here's a super simple project I made for our baby's owl room.

Owl Wall Art


1 Canvas + Painters Tape + Paint + vinyl owls = Cute baby wall decor


1. Paint your canvas white.

2. Once it is dry, tape off across the middle horizontally and vertically. Make sure it sticks down tight.

3. Paint each quadrant whatever colors match your babies room.

4. Once they are dry, carefully remove the tape. Touch up if needed.

5. Add your vinyl stickers.


Hang it up!

It doesn't get easier than this. Change up the paint colors and stickers to match your baby's room.
Have fun craftin'

Related Posts with Thumbnails

March 9, 2011

Bottled Water vs. Tap Water

March 9, 2011
We live in the desert where good water is hard to find, unless you buy bottled water or a fancy schmancy water filter.
Sometimes when I stand in line at the Wal-Mart checkout I see folks with carts packed to the brim with CASES of bottled water.

I've been there.

We used to be the ones loading up our carts with H2O. But in our defense, we did one thing differently. We would use the bottles and then we would refill them a couple of times before we would throw them out. But we still threw them out. Cart loads of them! Some of them destined for the dump; Others off to a recycling facility to be made into new bottles. At least I think that is where they go. . .

-I have learned a little bit about water since those days. The first piece of incredible information I came across is that most of that "mountain spring" bottled water from some exotic land is really just tap water. (GASP!)   And not even great tap water!

-The second tidbit of amazing information is that most of those recycled bottles don't end up at your neighborhood recycling plant. And they usually don't get made into new bottles. So where do they go?

Here is a  fun and informative video that tells the whole story about bottled water. It will make you think twice before you grab that $2.00 bottle of glacial spring water from the Alps.


So the moral of the story is: Buy one good bottle and refill it.
And depending on where you live, your tap water may be healthier and better tasting that the stuff in the  bottle with a mountain on it.


We absolutely love these convenient BPA Free Camelbak bottles.

They cost about $13 each and they are worth every penny.  And just think how much money you save by filling up your new bottle at home. Cha Ching!
Related Posts with Thumbnails

March 8, 2011

Strive to be debt free.

March 8, 2011
A prison is something that holds you captive.
It can be made of cement and iron bars, or it can be a vice like drugs, pornography, or debt.


I don't want to be a hypocrite, I am currently in debt. We are still paying for our car and we have 2 credit cards that we still owe on.  But compared to where we were a few years ago our position has vastly improved! We are slowly, and steadily digging ourselves our of our debt prison.

Society today convinces us that debt is a necessity to get where we want to be in life. If you want a nice car you have to have a car payment for the next 3-6 years. If you want a nice house you get a 30 year mortgage. Almost every department store has it's own buy now pay later plan. It's an instant gratification world out there.
And we fall for it.

The credit card companies are making billions of dollars off of interest and fees just so we can have that pair of shoes a month earlier than we would have if we paid cash.

 I was thinking today about happiness and what would make me a happier person. Paying off my debts was at the top of the list. In the last 2 years I have paid off 3 credit cards! (happy dance) There is NOTHING that compares to the feeling of sending in that last payment! I can't wait until we can send in the last payment on our car and our last 2 cards.

When I had my oldest son we went from a 2 income household down to 1 income. Our biggest mistake was not preparing ourselves for the change. We talked about it all the time but we never sat down and prepared a budget for just one salary. Old habits die hard and it took all of our savings and some credit card debt before we finally adjusted to our new life.

I read a popular book that has helped more than anything else. It is Dave Ramsey's "Total Money Makeover". The concepts are simple and straightforward. Don't buy what you can't afford. But sometimes it takes hearing the stuff you already know out of the mouth of an expert to make it really sink in.


If you have debt you want to get rid of, you have to read this book!

I'm planning on paying off the rest of our debts withing the next 2 years (hopefully sooner) and knock down our debt prison walls for good! We no longer use our credit cards and we haven't missed them even a little bit. We can do this!

Being debt free = happiness!
Related Posts with Thumbnails

March 7, 2011

All Patched Up - DIY Designer Boy's Jeans Tutorial

March 7, 2011


All Patched UP - Boy's Designer Jeans Tutorial
What you need:


Jeans
Sand paper
scrap denim
Wonder-under (or other lightweight iron-on fabric adhesive)
Sewing machine
Embroidery thread and needle
Anything else you want!

If you are doing this for girl's jeans you can always add appliques, gems, ruffles, or tons of other fun stuff.  I like to keep it simple for my boy's jeans. This is also great for hand-me-downs that need a pick-me-up.

Step One: Rough 'em up.
Use your sandpaper to distress the parts of the jeans that would normally get the most wear. Use care with the knee area though. The knees are usually the first part to wear out on their own.  Rough up the front and back pockets and you can even choose some spots to wear all the way through to give them an authentic vintage look.  The sandpaper will make a more dramatic effect on darker demin.


Step Two: Patch it.


Draw the desired size and shape of your denim patches onto the smooth side of your Wonder-Under.Cut them out and figure out how you want them on your jeans. (The oval shaped one will be going on the inside of my jeans.)


Iron the wonder-under onto the denim fabric according to the manufacturer's directions.


Cut them out, peel off the backing..


 and iron them onto your jeans.  I like to do some on the inside too reinforce the areas where I have done the most distressing or where I have sanded all the way through the denim.


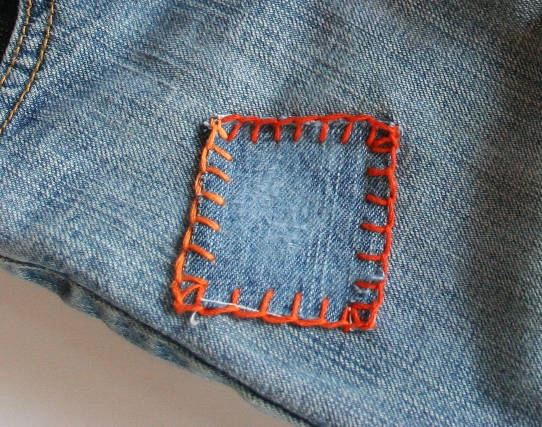
Sew on your patches to secure them into place. You can also use decorative stitching to add more oomph! I will be using embroidery stitching for most of mine. I used my machine for the inside patch. What a cool vintage effect!   
I love playing around with fabrics patches too. Try using canvas or other sturdy fabrics. 

Step 3:  Stitch it.
Be creative and add some simple embroidery stitches.

 I used a blanket stitch around 2 of the patches and a simple straight embroidery stitch for the third.


And X's across the pockets. I love the orange and yellow. It's so happy, not to mention that orange is Ryan's favorite color! He's going to love these.
 
A little color can add a lot of fun to some boring jeans. Or you can use neutral colors if you want to make sure your child's new jeans match his wardrobe, and his Cantaloupe Corner shirts, of course. Black, tan, grey, navy, or white.


That's it.
Now your kid has the cutest pair of designer jeans out there. Designed by you!


Go show 'em off!

(P.S. The "Super Hero" Shirt can be found HERE )
Related Posts with Thumbnails

March 5, 2011

Sunshine Saturday - Say Thanks!

March 5, 2011
I was reading this post on I Am Momma - Hear Me Roar this week and it gave me the kick in the pants I needed to set up a new goal for myself. I want to spread more sunshine!

She challenged her readers to leave a note for a restaurant server last week, and this week's challenge is to call up someone you haven't talked to in a while. Those little rays of sunshine can light up someones life!

My new goal is to give a thank you card at least once per week. Maybe to the sweet girl at the doctor's office that always takes the time to ask how I'm feeling, or maybe to my amazing sister that babysits my kids, or to a fellow shop owner who has inspired me.

When I am the receiver of a simple thank you note it changes my perspective on my day. My burdens seem a little lighter, my boy's don't drive me as crazy, and the feeling is contagious throughout the entire house. All from a simple thank you.

I received a few notes this week from thankful customers and each one made me feel like a million bucks!   Now I want to pass that feeling on to everyone!

And, I want to say thank you to everyone who reads this blog and to everyone who supports Cantaloupe Corner!  Thank you for spreading your sunshine with us!
Related Posts with Thumbnails

March 4, 2011

Simple Photo Tips for your Etsy Shop

March 4, 2011
The most intimidating part of opening an Etsy shop was pulling up Etsy's front page and seeing the GORGEOUS pictures that grace the front page. Wow! I thought that everyone must have hired a pro photographer because my pictures looked absolutely nothing like theirs.

Without the budget for a pro, I picked up some books at the library and checked out some photography articles on Etsy. And I realized that (surprise!) most of the artists actually do their own pictures too!

But all I had was a puny little camera. Not one of those fancy things with the big ol' lens that you see real photographers with.

Turns out, all you need is a decent camera and a little bit of know how. Sure the big fancy cameras are nice but your camera is just a tool. It is like an artist's paintbrush. Just owning a nice camera doesn't make you a great photographer. You just need to know how to use what you have.

I am no professional, but I have learned a few tips and tricks that have vastly improved my Etsy shop photos. Hopefully these will help someone out there that is having the same problems I did.


Tip#1:
The best tip I have learned thus far is use natural light whenever possible. PLEASE, don't use your camera's flash! It messes with the colors and shadows and always makes the photo look dark and dingy. Take your items outside or near a window and use the power of the sun! Also, try to avoid direct afternoon sunlight as it creates harsh shadows and can sometimes mess with the photo colors. I take pictures out on my covered porch in the mornings between 8 to 10.

Tip #2:
Keep it simple. Don't clutter up your backdrop. Your customers' first impression is going to be from a small thumbnail photo of your amazing item. They need to be able to see it clearly and know what it is. I stick to all white backdrops when I am photographing just my t-shirts or onesies. A sheet of white foamboard is perfect! Just don't let little sticky fingers find your favorite white backdrop.
I have also seen some beautiful photos with simple patterns and props in the background, like this one from jacaranda designs.


Tip #3:
If you are selling an item that someone will wear, modeled shots are fantastic to have. When I am shopping for my boys, I want to see how something is going to fit them before I even think about buying it.  Find a model and backdrop, and some natural light and take some action shots of your items. If you are photographing children, get down on their level. Make sure the modeled item can be seen clearly in the photo.

Tip #4:
EDIT! Edit! EDIT!
The greatest part about digital photography is that you can take as many pictures as you want, keep the good ones and delete the bad ones.
 Take your favorite shots and put them into a photo editing program such as Photoshop. I don't have "Photoshop" but I use 3 different programs to get the exact image I want.
1.Google's free editor is called Picasa. It has limited editing features but most of the stuff you really need to do can be done in this easy to use program. I use this program to crop, straighten, brighten, and saturate the colors in my photos.
2. If you want to take it a step farther, try http://www.picnik.com/ . This is also free to use and has lots of simple editing settings to make your pictures look amazing. 
3. And the last program that I use is GIMP.  This is an amazing FREE photo editing program that has many of the capabilities of Photoshop. It takes some time to get to know the program because it is so versatile but it is totally worth it. This program is great for major photo editing and creating images such as shop banners and avatars.


My normal everyday photo edits include cropping and playing with the exposure and contrast in my photos. These simple things can turn a "sorta good" photo into a "wow!" photo.


Before:


 After:


Before:

After:

Happy photo snapping!
See more great photo articles in Etsy's Guide to Photography.

Related Posts with Thumbnails

March 3, 2011

{ White vs. Wheat } Why wheat is. . . NEAT!

March 3, 2011
Do you stand in the bread isle at the grocery store and stare at the hundreds of bags of bread wondering which one you should pick? They all tout their nutritional value on the labels. "Made with Whole Grain", "Enriched with Iron", " High Fiber", "No Corn Syrup". (did you even know that most breads have corn syrup in them? ugh.)

When I would find myslef lost in the bread isle I would usually end up grabbing what ever bread was on sale because I didn't know what the difference was between the 99 cent loaf of white or wheat bread and the $5 loaf of "whole grain" bread.
Once I started learning to read the labels I found all kinds of additives, sweeteners, preservatives and other stuff that I really don't want to be eating or feeding to my family. So I took on the task of learning to bake my own.
And when it came to making my own bread I started by choosing whatever recipe sounded the tastiest and easiest.  I LOVE sweet white rolls, but I know that wheat bread is supposed to be healthier, right? 
Yes, but why?


Wheat is sometimes called the "staff of life". A person can survive off of the nutrients found in the amazing wheat berries.

We hear a lot of health advice these days that tells us to increase our intake of whole grains. Great advice. But when it comes to wheat, what is best?


White flour comes from wheat, right?

Yes.

So why have we been warned about eating white flour?

White flour is significantly different than freshly ground wheat flour.  It has been processed and bleached, which is why it is white and not brown. Most of the nutritional value and fiber was sapped away in the processing. In fact, so much of the nutrition is missing that their are government regulations that require a minimal amount of the nutrients Thiamin, Niacin, B1, B2, Folic Acid, and Iron to be added back into the flour!
If you want to learn more about what happens to our flour when it is processed, here is a very informative website.

Here is freshly ground wheat flour (made from white wheat):


And compare that lovely flour to the all-purpouse baking flour we buy at the store:

And if you could touch it and smell it you would notice an even BIGGER difference in these two flours.


If wheat flour is so much more healthy, why does everyone use white flour? 

Shelf Life.  Wheat flour contains oils  that go rancid over a short period of time. These oils are removed from white flour when the wheat bran and wheat germ are removed, which makes the flour last much much longer. This is why it is so popular for commercial baking. White flour can be bought in bulk and stored for long periods of time.
Even many of the "wheat" breads we buy at the store are made from white flour mixed with just enough wheat flour to make the bread look brown. Some bread makers even add caramel coloring! Seriously!


To read more about the great stuff found in fresh wheat flour, check out this website.


I have seen wheat flour sold at the grocery store. Is it as healthy as freshly ground wheat flour?

Not quite. Often times much of the oils are removed from the wheat flour found in stores to prolong the shelf life. And if you do find 100% freshly ground wheat flour available to in your store you still can't be sure how long it has been sitting. The longer it sits, the more nutrition it loses.   I highly recommend buying the wheat flour over white flour but if you have the choice, go fresh!


How can I get freshly ground flour at home?

There are many types of grain mills available. Some are electric and some are hand crank powered.
I don't have my own yet but I am borrowing my MIL's electric mill.  I just have to turn it on, pour in the wheat, and in about a minute I have beautiful, fragrant, wheat flour.  If you are in the market for a grinder, do some research to find out which is best for your needs. Ebay also has a lot of options for great prices.
Or, you can ask your friends and family if they have one you can borrow.

Here's the mill I'm using:
It's called the Whisper Mill.


What can I do whith my fresh wheat flour?

Wherever you use white flour, you can substitute your wheat flour. I use it mostly for pancakes, muffins, pizza crust, and breads. I am AMAZED at the difference in taste! My kids absolutely love the whole wheat bread. And I feel like a good mom because I know they are getting more nutrition and fiber from the "real" bread.


And if you aren't a pro bread maker, don't worry! There are tons of places out there that can give you tips on how to make your bread the right way.  I use a bread machine to mix my dough. I got my brand new machine for $3.00 at Salvation Army. Best purchase ever!


Here are my 2 favorite bread recipes. I use them so much I can barely read my printed recipe cards. Thank goodness they are still available online.

Just replace the bread flour with your fresh wheat flour.


mmmmm. You will never want to go back to plain ol' white bread again.
Related Posts with Thumbnails

March 2, 2011

Happy living!

March 2, 2011
Have I ever mentioned that I lalalove what I do?

I do!

I am a Stay-at-Home/ Work-at-Home-mom and I have the unfathomable privilege of getting to use my creative side every day! YAAAY!

I have been thinking a lot about where I want to go with my business and my blog. I will be closing up shop for maternity leave at the end of April but I am planning on keeping the blog up and running.
Cantaloupe Corner has been successful because my customers (yes you!) appreciate high quality clothing free of harsh chemicals and inks. I try my best to live life with your children's mental and physical well-being at heart, and that starts at home with my own children.

At our house, we like to live as "clean" as we can. I don't mean that my house is clean. No, I still step on matchbox cars and Thomas trains every single day, my floor is always sprinkled with sand from the sandbox, and my sink is rarely empty. To me, living clean is keeping the hazardous, cancer causing junk, and anything morally or emotionally degrading away from our home and away from my kids.  I believe that when God made the earth he put everything here that we need to be healthy, strong and HAPPY!

Along with more craft tutorials and fun stuff, I want to include my own tips and tricks and new things I learn about living clean and happy while staying on budget.

I have already included my Fruit and Veggie Wash recipe. It is a great way to start kicking out much of the pesticides and gunk that lurk on your foods.


My tip for today is: SMILE!
Did you know that even if you are having a horrible day, smiling releases endorphines that will help you start feeling better as soon as the edges of your mouth start to turn up.


Try it.


Feeling better already?
Related Posts with Thumbnails

March 1, 2011

Baby's Room Lamp Re-vamp

March 1, 2011
Remember the Drum Light I made out of stuff I found around my house?

This one:

With our new baby coming, it's time to de-girlify his room/my office so we can eventually turn it into his nursery.


That pretty lamp got a make-over and became THIS:

Bye Bye girly.  Hello boy!

I removed the floral fabric and replaced it with a funky patchwork of the same fabrics I will be using throughout his room.   I also shortened it  a bit by cutting the side wires shorter. Then added some equally funky ribbon trim to finish it off.
Do you want to build your own? Find the tutorial Here


The room looks completely different from when I had my pretty lamp hanging up. The striped wall paper is gone and cantaloupe orange paint has taken it's place. I can't even begin to describe how much I love the color!

 And did you notice the shelf?

I stripped the fabric off of my girly shelves and recovered them to match the room. Each shelf only took about 15 minutes to do! It's a simple way to hide an ugly shelf or add some extra color and texture to your room. See the Fabric Covered Shelf tutorial here to make one of your own.


Related Posts with Thumbnails
 
Blog Design by Eedee Design Studios