Showing posts with label projects. Show all posts

August 25, 2011

This is Epic!

August 25, 2011
I'm the proud mommy of a Kindergartener!
Simon is just finishing his 3rd week in school and he is loving every second. He comes home happy and exhausted every day. Every day he has new stories and lots of new questions. I am so proud of him and his endless ambition to learn everything he can!

I had so much fun making Simon new t-shirts to wear to school. Since I knew I wasn't going to be selling these I didn't have to be completely original in my designs. In fact, one of my favorite shirts I finished was a copy-cat of a great shirt I found at Nordstrom.com


Excuse the wrinkles. I had to grab these from my son's clothes pile and snap shots before the baby woke up. I think the wrinkles add to the vintage look. don't you?


Here is the original tee from Nordstrom:


You can find this tee Here.

I learned a new technique to get the vintage style ink-printing on dark colors. It worked really well and it left the shirt so soft, almost like there was no ink at all. I used the same technique on 2 other shirts as well. It's. . . EPIC!
 I'll post those shirts as soon as I get caught up on my pile of laundry, a.k.a Mount Washmore.


Related Posts with Thumbnails

April 22, 2011

MARCO. . .

April 22, 2011
. . .POLO!

My li'l bro asked me to make him some shirts and he brought me a challenge I hadn't tried yet: Polo shirts!

I didn't want them to look like bowling shirts, which is easy to do when you are printing on polo shirts. Me and my hubby brainstormed and this is what we came up with:


Just to give you some background on why we chose these designs: My brother is taking heavy equipment courses through NAVIT right now in school and he gets to drive big trucks and tractors. He absolutely loves it! He wanted me to incorporate tractors into one of the shirts.


The red shirt was inspired by his nick-name "Crash". He has had some bad luck in the last few years and has had broken bones, been hit by a car (ouch!) and he was in a car accident too.
He has a great sense of humor about his luck and sometimes calls himself the "crash-test-dummy." lol.


I wrapped the side designs around the side of the shirt for a unique look.  


I just sent these to him and I'm happy to report that he "loooooooves" his new polos!

Now I want to make some for my boys too!
Related Posts with Thumbnails

April 14, 2011

Spring Cleaning - Step #1

April 14, 2011
It's that time of year again.
Can you feel it in the air?

I've been feeling it for a while now. Not only have my maternal nesting instincts kicked in but it has felt like spring here for over a month. We have even enjoyed temperatures dangerously close to the triple digit mark. yikes! (Did I say enjoyed? I meant tolerated.)

I have busily been moving from room to room decluttering and cleaning. I still have a looooong way to go. As we all know, the house is never clean enough for an expecting mother. (BTW, only 6.5 weeks to go, and counting!! eee!)


Roll up your sleeves and apply some elbow grease because we are digging into some SPRING CLEANING!


Step #1: Declutter and Simplify

Declutter
I'm kind of a pack rat and decluttering can be emotionally traumatic for me. I don't like to do it, but I can't tell you how good I feel when it is done. Freedom!!!!

One room at a time, go through your drawers, cupboards, boxes, totes, bookcases, etc. and sort anything you aren't using into 2 piles: DONATE and THROW AWAY.


Keep in mind that the things you keep should be of value to you. If it doesn't mean anything to you and you aren't using it, get rid of it! Donate any nicer items that someone else would be able to use or enjoy.

REALLY think about it's value to you.
-Does it have sentimental value?
-Are you currently using it?
-Will you for sure be using it in the near future, or when it is in season?
-Does it add to the beauty and function of your life and home?

If it doesn't qualify for any of these, it is much better to get it out of your house.


Last week I took an SUV full of old clothes, books, toys, linens, blankets, decorations, etc. to Deseret Industries (D.I.). If you don't know about D.I., they are a thrift store set up by the Church of Jesus Christ of Latter-Day-Saints. It works just like Goodwill.  They take donations and use the store as a way to offer job training and employment for those in need.
I choose to donate rather than to hold a garage sale because I love the feeling that my nicer items are really helping my community. And it saves me the work of sorting, pricing, and spending a day in the blazing sun.

-Take your "Donate" pile to the thrift store within a week of sorting to make sure it doesn't get forgotten or stuffed in the garage or spare room. (We've all done it.)

-Take care of your trash as quickly as possible also. If you don't have room in the garbage for bigger items, set up a pick up day with your local sanitation program, or find a friend with a truck and head to the landfill. Just get that stuff out of your house ASAP.


SIMPLIFY:
Don't let those "hot spots" get cluttered up again. If you find places in your home where things tend to pile up, come up with an organization solution.
-Do you need a wastebasket to catch incoming junk mail?
-A mail sorter?
-Somewhere to hang coats and backpack, or store shoes?
-Maybe a basket for keys, and other items that we drop as soon as we come through the door?
-A filing system for bills and important papers, or coupons?

Take care of these problems now before they return to the terrible, menacing piles that they were before.

Whatever the area is, think "simplify, simplify, simplify."


Once the clutter is gone, take a deep breath. You just tackled the hardest part of Spring Cleaning!

Spring cleaning isn't just about spotless floors and clean cupboards.When you simplify your home you are also simplifying your life. Clutter in your home = Clutter in your life. Declutter your home and you will feel more organized and less stressed.
When you feel at peace with your surroundings you will find more happiness and peace in your life also.

I'm going through the life/home decluttering process too. The more "stuff" I can let go of in my home the better I feel. It really is a weight off my shoulders.

My new favorite quote is "Simplicity is the greatest form of sophistication." (Thomas S. Monson)


Now that you are feeling lighter and more organized, we can start deep cleaning!
Related Posts with Thumbnails

March 28, 2011

The Non-Quilter's Baby Quilt.

March 28, 2011
I'm not a quilter.

There. I said it!

I don't really like to quilt, and I probably never will. Any project that takes me longer than a day usually gets set aside and forgotten about. I don't particularly like blistered fingers from tying or hand stitching a quilt. ugh.


But, I do make quilts for each of my babies before they are born. This is my 3rd baby and my quilts are actually improving!
Imagine that!
Practice really does make a difference.

For our baby, who will be here in May, I made a funky owl quilt. (I love all of the cute trendy owl stuff that's out there in craft land right now!)

I call this one the non-quilter's quilt because none of it was done by hand and the hardest part of the whole thing was the edges. No intricate pieces, no hand stitching! That's my kind of quilt.

The quilt top is just some big ol' patchwork squares, orange borders and owl appliques. Easy peasy.

I machine stitched the layers together with some simple outlining.

I wanted to learn how to do the triangle edges because that what my mom and grandma always did on their fancy quilts. It's not as hard as it looks but it does take some time.
If you want to give it a shot, HERE is the tutorial for the triangle edges.

If I can do it, so can you!


The quilt colors even match Mason's lamp and shelves! 

I can't wait till he gets here so I can hold him and wrap him up in his cuddly quilt! Hurry baby!


There are only 9 weeks left until my due date! I am so excited/anxious/nervous.
3 kids is going to be an adventure all it's own.

Related Posts with Thumbnails

March 25, 2011

Frayed Train T-shirt - with Tutorial

March 25, 2011

Here's a great project for your little train lovin' boy.


TUTORIAL:


What do you need?

Train Template - Engine and 6 cars
Fabric Scraps
Pencil
Fabric marking pen
Wonder Under (iron on fabric adhesive)
Scissors
Lots of Buttons

1. Trace your patterns onto the Wonder Under iron on adhesive.


2. Cut them out.


3. Iron each piece onto the wrong side of different scraps of fabric. I used canvas and heavy cotton fabrics that fray well.


4. Cut out each piece about 1/4 inch outside of the Wonder Under border.


5. Turn over your freshly cut train pieces and use your pattern to draw the train shape on the right side of the fabric using a washable or disappearing ink. I love my "Mark-B-Gone" marker for these types of projects. For dark fabrics you can use a white colored pencil or chalk.  


6. Arrange your train on the t-shirt and iron it down according to the manufacturer's directions.


Continue onto the back of the t-shirt.


7. With contrasting thread, sew around each train car on the line you marked earlier.  I made the mistake of using matching thread and i had to go back and re-sew the train edges so you could make out the train shape.


8. Fray it. Use your fingers or a nylon brush to gently fray the edges. Be careful not to rough up the t-shirt. Of you can throw it in the washing machine and let it work it's magic.

9. Make your freezer paper stencil. I used my handy-dandy craft cutter to cut this one. Iron it onto your shirt on low heat.


10. PAINT! (the best part!) I used screenprinting ink but you can also find textile paints at your local craft store.


11. Collect your buttons. 15 small buttons and 1 large button.  This is a good way to use up some of those buttons that have sitting around in your craft supplies.


12. Sew on your wheels.

That's it! And now you have a one of a kind Frayed Train tee for your "Trainiac".


We just linked up to the fabulous I Am Momma Hear Me Roar Blog. Cheri is hosting "Let's Hear it for the Boys" shirt contest!
 If you need some crafty ideas you NEED to check it out! There are so many amazing entries already!
Related Posts with Thumbnails

March 1, 2011

Baby's Room Lamp Re-vamp

March 1, 2011
Remember the Drum Light I made out of stuff I found around my house?

This one:

With our new baby coming, it's time to de-girlify his room/my office so we can eventually turn it into his nursery.


That pretty lamp got a make-over and became THIS:

Bye Bye girly.  Hello boy!

I removed the floral fabric and replaced it with a funky patchwork of the same fabrics I will be using throughout his room.   I also shortened it  a bit by cutting the side wires shorter. Then added some equally funky ribbon trim to finish it off.
Do you want to build your own? Find the tutorial Here


The room looks completely different from when I had my pretty lamp hanging up. The striped wall paper is gone and cantaloupe orange paint has taken it's place. I can't even begin to describe how much I love the color!

 And did you notice the shelf?

I stripped the fabric off of my girly shelves and recovered them to match the room. Each shelf only took about 15 minutes to do! It's a simple way to hide an ugly shelf or add some extra color and texture to your room. See the Fabric Covered Shelf tutorial here to make one of your own.


Related Posts with Thumbnails

November 2, 2010

Feeling green?

November 2, 2010
If you feel a little green, or it happens to be your favorite color, why not dress the part?
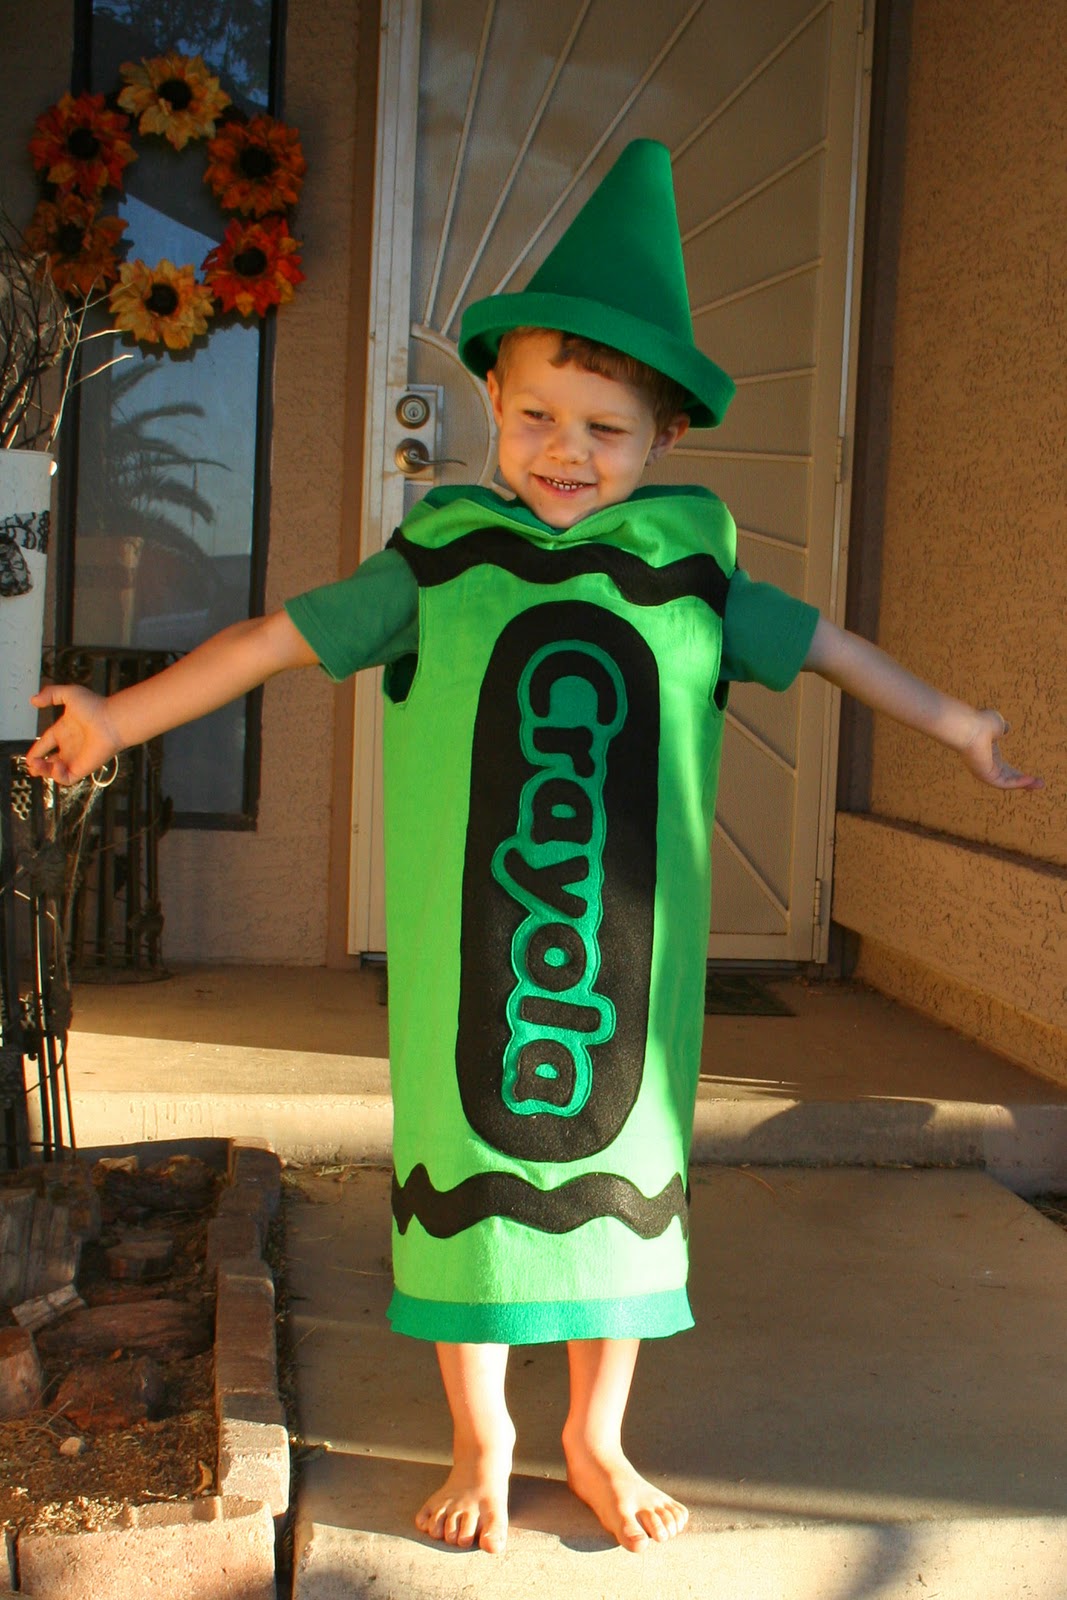
I wasn't planning on attempting to sew costumes this year but when my son told me he wanted to be a green crayon I couldn't pass up the oppurtunity. 

He was so happy with his costume I had to practically wrestle him out of it. He wanted to wear it to play in the sandbox, to dinner, to bed.
I love my kids!

The little guy? He was a lion! He wasn't so happy with his costume.

Let's just say the lion's hair suffered some major damage and the little lion went mane-less. 


I hope everyone had a fun candy-filled Halloween!
Photobucket
Related Posts with Thumbnails

September 9, 2010

Now it's Personal!

September 9, 2010
We celebrated Little Monster's b-day last week and I printed his very own personalized Choo Choo I'm 2 shirt with his name on the back!  And I added embroidery thread stitching on the sleeves and hem. (inspired by I am Momma Hear me Roar!)

I've been waiting SOOO long to use this design for my own kid!


I love the name on the back so much that I wanted to make personalized shirts available to you too!
 Oh Yeah!
You can have your child's name stencilled on the back of the shirt using this unique technique that makes it look distressed and faded.
It is also done with our gentle dye remover. No ink and no paint!

Just add this item to your cart along with the shirt you want to personalize.
(Perfect for birthdays!)


________________________________________________________________________________

For Ry's birthday I got to give my craft cutter a workout. But I thought it would be fun to make personalized invites for his party!


 I searched frantically though the internet to find the perfect train cupcakes and found nothing! So I had to improvise.
I cut cream cheese candies into cute little trains to top off the cupcakes. A little green grass and orange sprinkles and voila! you have Choo Choo cupcakes!
I'll have to share the cream cheese candy recipe! It's super easy, fun, and YUMMY!


Mmmmmm!


I also made a train pinata for the party. It is made out of cereal boxes, an oatmeal canister, a toilet paper roll, tissue paper, tape, and TONS of CANDY!!!!
After all my hard work on this thing I didn't even get a good picture. I guess this isn't one of those "I'll get pictures later" projects, because now it is smashed into pieces in a trash heap somewhere. But it was fun while it lasted! The kids were in candy heaven.  :)


Here's a picture I snapped while we were in the White Mountains for the party.
 It was so beautiful I had to share.

Have a sunny day!
Photobucket
Related Posts with Thumbnails
 
Blog Design by Eedee Design Studios